18 October 2024

365 Quilt Blocks - 2016 (UFO)


In 2016 I had the brilliant idea of following the 365 Challenge, where for every day in that year a new block would magically appear in the In-Box and the challenge was to make it up. Over one year, each person would have 365 blocks from which to make a quilt.

It sounded like something I would enjoy doing...

Well!!! I got to somewhere mid-April and life soon took over and my "I'll sew it tomorrow, soon grew into "golly gosh, look how far in arrears I am".

And no matter how many good intentions I had, the list of patterns soon outgrew the number of completed ones!

And sadly, that's where it has remained - and now we're deep into 2024 and nothing has changed!

However, I thought it's still interesting to look at some of what I did, so here goes...

By the way, most of the blocks were 3" in completed size, with some 6" blocks thrown in for good measure. One of the 3" blocks had something like 42 individual pieces of fabric in it!!! And "yes", it's in these blocks somewhere!

The blocks are not in any sort of order, they are as they came out of their holding bay...


And the next 42 blocks...


And the final 19 x 3" blocks...


These are 6" blocks, which were interspersed in the daily number...


Liberty Fabrics - To Do

In 2015, 2017 and 2019 I visited the Liberty shop in London - one of my favourite places to stroll around. And over time, I have chosen a few pieces of fabric with which to do something - but what?

One of these days I'm sure I'll get the inspiration for which I am looking and then you'll be the first to see what it is!

In the meantime, this is a not-so-good photo of what I have in my Liberty collection.


My Ironing Board Mat

Before we left our previous home, I decided not to take a full size ironing board with us - it took up a lot of storage room and as I mainly used the iron for sewing stuff, I felt I didn't need the full size ironing board. And so it went to the ironing board heaven and I have made do with a smaller, table-top ironing board - which so far, I'm very happy with.

However, as it sits on our table, I thought that maybe a mat under the legs might be good idea. And so was born my ironing board mat, as seen hereunder. And "yes", it's padded and quilted - of course!


And here it is, in situ:


Beechworth Quilt - To Do

In May 2018 we drove to Beechworth, Vic with our friends, and towed our respective caravans.

As part of our time in Beechworth, I visited a quilt fabric shop which was in a home, out of town. She had a wonderful array of fabrics, out of which I chose one piece in particular that caught my eye.

I've had a couple of ideas what to do with it but so far none of them have born fruit. Some of the fabric is already cut into 6" blocks, ready to piece but one of my great ideas actually was going to look awful had I carried on with it - and so I'm now up to about version 3 or 4. And so eventually it was placed in a plastic box awaiting further inspiration.

Herewith is the fabric and some of the options:

Option 1: To be patched with multi-coloured blocks in between. The colours are the same as in the floral fabric but I felt they dominated, rather than enhance the florals. So, I'm pretty sure that won't be a go-er! However, I'll use the multi-coloured blocks elsewhere, that 's for sure!


Option 2: To be patched with a light pink, as in the floral (note: these are pieces of fabric yet to be cut, so apologies that they have that crinkled look - that's coz they are crinkled!


Option 3: to be patched with a medium coloured pink, again this pink matches some of the pinks in the floral


Option 4: to be patched with the deepest pink within the main floral fabric


Overall: I still can't decide. Pink it is but which one? I'm weighing up which one will enhance the floral the best.

What I do notice is how the different shades of pink enhance their respective tones within the florals.

NOTE: I'm very happy for you to offer your choices!


The Wild Goose Wall Hanging - To Do

This is a photo of a wall hanging I want to make - I've gathered all the resources to do it - I just need to put my head down and get on with it.

The Wild Goose represents the Holy Spirit in some cultures, including Celtic cultures and as I have a LOT of Celtic heritage I thought it seems appropriate to make it and hang it in cur home. 

Watch this space...


iPad Bag - version 2

With my previous iPad bag gone (see another page), I made another one - it is very different than the last bag but it holds the iPad and accessories, as well as a spot for a pen.

It's been used to death but is still going strong.


iPad Bag - Stolen in NYC

I bought a soft backpack bag which I thought would be perfect for travelling - putting small bits and pieces in, when flying - to use at Airports. After all, who wants to be carrying a lot of stuff around Airports, when you're tired and weary?

Grrr... I took my eye off the ball for no more than 5 minutes and it was gone! And of course everything that was inside! We looked high and low and went to every known Airport Department in the hope that someone had handed it in or that I had left it somewhere - we wasted hours trying to track it down. We checked all the bins in case the thief had taken the contents and discarded the bag but again - no luck! It was gone!

And this is a photo of said bag - I might even try and buy another one and duplicate what was lost before our next trip? But will I???


Kawandi Place Mats

During 2023, one of the girls at my local Quilt Club showed us how to make things in the Kawandi-style. And so, like some of the others, I had a go and here's the results.

This first photo is of my first attempt and it is hand stitched - maybe I'm my own worst enemy but I am very critical of my work - others don't seem to agree with me.


And so for my second Kawandi piece, I decided to machine stitch it - much happier with the result.

I use both of them as coffee table mats


And then I decided to have another go at hand-stitching a piece of Kawandi - this time I'm being a bit OCD with the project - it's a bit slower to do but I'm much happier with how it's going. This is a photo in the early stages of doing it.


And here is the same item - the photo was taken in different light but I can assure you, it's the same work - a bit further advanced than before but not quite finished!


Mary-Nour's Baby Quilt

I've made this for the upcoming birth of our Great.Granddaughter, who is due in March 2025. Of course, we're all excited, as we herald in the next generation. I decided on the Quilt-As-You-Go method, for the ease and simplicity of the work.

Side 1:


Side 2:


Zip Pouches for my FMQ Ruler Work

One of the quilting techniques to which we were introduced through our local quilt club is Free Motion Quilting" and Quilting with Rulers. I loved both concepts. And of course being a bit OCD, I just had to have a range of rulers, didn't I?

And so gifts for the next couple of birthdays and Christmas for me, was dead easy... either rulers or vouchers to buy them.

Herewith is my range of quilting rulers - oh! And "yes", each has their own see-through storage pouch (of course): 


Ruler #1: HQ Swiss Cheese Template


Ruler #2: Bernina Squiggle


Ruler #3: Bernina Mini 4 in 1 (includes Apple Core)


Ruler #4: HQ Oval D Templates


Ruler #5: HQ Hands Versa Tool


Ruler #56 Bernina Straight Line 


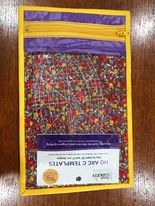
Ruler #7: HQ Arc C Templates


Ruler #8: Bernina Foot Extender #72 (another one I use quite regularly)


Ruler #9: Bernina Circles


Ruler #10: HQ Half-Circle Templates


Ruler #11: Bernina Oval Templates


Ruler #12: HQ Mini Scallop Ruler (and this is the one I use most of the time)


Note: HQ = Handi Gadgets (the trade name)

Cutting Board Bag

This project was definitely an evolution, starting out being something for this and finishing up, still as a something for "this" but it turned out to be bigger than Ben Hur for what the project called for. Oooh! Bad English there! Apologies...

I cut a board (of thin wood) on which my large cutting map could sit, as I cut on our Dining Room table, so that if I cut beyond the mat, the rotary cutter would not cut into the table itself!

So far, so good! So the board was prepared and bound with tape to prevent splinter accidents happening. But how to store said piece of wood? And maybe the cutting mat as well.

Ah! Of course, make a bag for them! So bag was duly made, complete with a handle. Oooh! the front looks a bit bland - let's make a pocket for whatever. And then let's put an appliqué on the pocket. What though? Why not an "M" for Maggie? And so you're getting the picture of how this once simple project started evolving into something which was bigger than the original plan...

And so herewith, is said carry bag...


.. with the board showing through the opening.


Kent Flag Mug Rug - To Do

Norm has Kent County heritage (UK) and so this is yet another Mug Rug to be made. In the meantime, herewith a photo of the Kent flag - until it's replaced by the Mug Rug itself!


Squishy Bags

Making Squishy Bags was another workshop I did with our local quilt group. I love them and find them ever so useful.

This one holds my small iron, making it easier to carry to workshops and the like - as well as storing the iron. I have another in the caravan which holds my travelling hair dryer.


Sashiko Panels x4

I found these Sashiko panels in a quilt fabric shop - as one does - and really loved them. I bought, I stitched but I can't say - I have finished them, yet! They can be used either as cushion covers or wall hangings - I've opted for the latter - we already have way too many cushions and accompanying covers! I have 2 of the wall mounts but even with them, I haven't taken the next step! Hopefully, that will happen within the next 6 months - coz now they are back on my radar and let's get the job done and them hung!

And then they can be hung on one of the walls of my sewing room. Yay!


Project Bags

If there's one staple a person involved with crafts, and especially sewing or thread related crafts needs, are Project Bags

This is my Mrs Bobbins Project Bag - I love Mrs Bobbins. I discovered her on Facebook - she's always getting into trouble with her Mr Bobbins and leads him on a merry chase, as she continually visits fabric shops and, in his opinion, buys way too much fabric.


And yet another Project Bag.


One can't have too many Project Bags - they are just so useful. This one is showing off the plastic front which they all have.


So to prove a point, here are a few more - this one has the requirements for some Sashiko I am working on. All I need to do is to grab the bag and all that I need is already inside - ready to go!


This Project Bag has all I need to finish one of the quilts I am still working on...


And here are more, waiting patiently in their box for each project to be completed.


Japanese Tea Mug Bag

I attended our State Quilt Exhibition a few years back and was intrigued by this little kit of making a tea-cup travel bag. So, after humming and haring over it for a while, I lashed out and bought the kit. Note: the kit did not include the fabric.

My Japanese Tea Mug Bag, complete with a tea mug inside. Errr... There just happened to be another staff at the exhibition which sold Japanese pottery!


And so the journey begins...


And continues...


Just a few more steps to go...


And as every tea mug needs it's own coaster, let not this one be out of step!


And finally, my Japanese Tea Mug on its Coaster - the journey is complete!